Fort Riverwatch
Built during the Elfwar, Riverwatch was designed to protect the villages along the great river and signal both up and down river. During the Age of Madness, cultists within the army constructed a temple to the 7 underneath the keep. This temple was used until the keep was abandoned during the Lawless age. In the trailing years, a tribe of Kreck, having escaped the imprisonment of a nearby wizard, climbed the walls and hid within. The tribe has lived here for almost 30 years, foraging in the nearby countryside. Wary of the new outsiders that have settled nearby, the Kreck have started acting by moonlight in hopes of remaining undisturbed. Unfortunately this has lead the settlers to fear the Kreck almost as much as the Kreck fear them.
TODO: #HINT
| 1d6 | Rumor |
|---|---|
1 |
Shadowmen have taken over the fort. They’re crafty and sneaky, watch your back! |
2 |
Cultists controlled that fort, it’s likely full of dark magic. |
3 |
Watch out for the armored statues, one of them move! |
4 |
There’s old ballista all along the wall of the fort. I’ve seen figures tinkering with them, they must still work. |
5 |
Astorian armories supposedly had secret vaults where they kept soldiers pay. |
6 |
There’s an evil below that fort. The kind that can destroy a man. |
7 |
I heard that the fort was abandoned after the well turned poison, I wouldn’t drink anything you find there. |
8 |
There’s a weird engraving on the rock outside the fort |
9 |
Part of the northwest wall is crumbled, maybe you can climb in that way? |
10 |
The portcullis is rusted shut, it’ll take some real strength to open it. |
Random Encounter Table
Each named character on the encounter table is removed if they are killed or sacred off. Unnamed encounters will occur 3 times before they are extinguished. On a 5 or 6, tick down a torch, on just a 6, tick down a lantern.
The first table should be used when the party is above ground (rooms 1-11,) and the second should be used when the party is in the temple (rooms 12+)
There are a total of 22 cultists, plus Dwyer. If there are not enough cultists to fill out a rolled encounter, the remaining cultist are that group and are attempting to flee.
| 2d6 | 1 Encounter | 2 Clue | 3 Effect | 4 Effect |
|---|---|---|---|---|
1 |
2d4 cultists |
An amulet. |
Talking in the distance |
Sudden goosebumps |
2 |
The ghost of Martin |
A sudden cold spot. |
Screaming and pounding on wood |
The sound of fire |
3 |
A scrap of wax cloth, with mustard on it. |
A door slams shut somewhere |
A shriek of fear |
|
4 |
1d3 Krecks |
A path of several sets of wide footprints leading to or from the hall. |
Rocks tumbling |
Scraping stone |
5 |
A single path of wide footprints with a trail of wheat grains leading to the kitchen door. |
The smell of fresh barley |
The sound of munching |
|
6 |
A glimmer in the corner of your eye and a melodic voice in the distance |
A field rodent gesticulates towards nothing, sees you, then runs off |
The feeling of being watched |
| 2d6 | 1 Encounter | 2 Clue | 3 Effect | 4 Effect |
|---|---|---|---|---|
1 |
2d4 cultists |
An amulet. |
Talking in the distance |
Sudden goosebumps |
2 |
Dwyer Jupe & 2d2 retainers |
A scrap of paper with the idle thoughts of a madman. |
A sense of dread |
Maniacal Laughter |
3 |
1d6 clockwork dolls |
Bits of a construct |
Squeaky voices speaking nonsense |
a collapsing tower of dolls (attempting to open a door) |
4 |
A confused junior cultist |
A hint. |
Repetitive mantra. |
A sudden crash and a yelp. |
5 |
The Gelatinous Cube |
A still dissolving rat |
The walls are slimy but drying |
Jello Noises |
6 |
A glimmer in the corner of your eye and a melodic voice in the distance |
nearby whispers |
The feeling of being watched |
Named NPCs
Basil
AC -6, HD 1, MV 60 flying ATK Dagger (L) Morale 7
Basil is a Dragonfly-winged pixie looking for her friend Saffron (trapped in a lantern in Dwyer’s Office). The first time she is encountered, unless she is surprised, she follows the party for 5 turns while invisible, if she deems the party worthy, the next time she is rolled, or if the party finds a way into the temple, she will appear visible and ask for the parties aid.
Helping her will grant them one Fae Boon from her, or any of her kin. This boon can be cached in at any time, and can be a piece of good advice, a small non-unique item delivered in an hour, or relieving a fae-cursed of their curse (replacing their disadvantage with the human one. Their magical resistance stays).
Dwyer Jupe
AC -2, HD 3, MV 30, ATK +1 sword of reassembling (M) Morale 7
A human cultist of Aeto-Krah, Dwyer has become obsessed with the intricacies of clockmaking, and has built dozens of constructs to do his bidding.
Unless he is in his sanctum, he is always flanked by 2-4 cultist retainers, and has 2d8 clockwork doll bodies on his person. He can spend a turn activating 1d4 of them and tossing them at the party. In his sanctum he just has 3d12 clockwork dolls, but he can summon 2d6 of them per turn.
He will attempt to flee if dropped below half HP, and surrender if dropped below 1/4.
Dwyer has no ill intent towards the village and wishes to be left alone to his clockwork, but will fight to the death to protect his work from being destroyed.
Treasure 26 silver in his pouch, an Amulet of Aeto-Krah, a keyring containing the keys to his office and the main tower, and a Talisman of Passage.
Ghita
AC +2, HD 0 (1 hp), MV 30, ATK Clubbing Hand (L); Thrown rocks (L) Morale 3
Gheta is a kreck who has a constant craving for wheat grain and reading. She recently stole a sack of grain from a farmer and carries it around with her. Inside the bag is also a small iron key that opens the locks on building 5.
Gheta is not a fighter, and will surrender if threatened. If asked about anything she knows, she will answer truthfully, but knows nothing of the temple below. She will not join the party, but will instead return to her hiding spot in the Root Cellar.
If the party makes an impression on her, she will instead pass this information on to her tribe. If the party is kind to her, she will be later found arguing with the chief, otherwise, the tribe will be prepared to ambush the party when they arrive in 5A.
The Jadebelt Children
The dwarven youths are Culkin (the oldest, not afraid of ghosts,) Pollard, (the middle child, it was his idea to come here,) and Evaine (the youngest, doesn’t want to be here, but doesn’t want to be alone either.) All are children of Astrid Jadebelt, a fellow refugee. The children are harmless, but easily spooked. If surprised, one, at random, will make a single attack against the nearest pc at +4, before realizing that the party are, not in fact, ghosts and will apologize, and beg that their mother not hear of this.
If somehow, a player needs partymembers, the trio will join the expedition (roll stats as normal, but race is always Dwarf and occupation is always Armorer, they have no gear other than the knives they brought with them) otherwise, they will decide that this isn’t as much fun as they thought and leave. If asked if they found anything, the trio will tell the party that there’s a locked footlocker at one end of the barracks that they couldn’t get open.
Martin
AC -6, HD 6, MV 50 flying ATK Lonsword (M) Morale 11
-
Undead Makes no noise, immune to effects that require a living creature, immune to mind-altering spells.
-
Incorporial Cannot be damaged by non-magical weapons
Martin was burned alive in his room. If the party encounters him anywhere else, he will be a relived memory, doing something appropriate to the place he is. He does not interact with the party, and disappears if directly interacted with.
Avenging him, by killing the Head Cultist, or putting his body to rest will cause his spirit to pass on.
Saffron
AC -6, HD 1, MV 60 flying ATK Dagger (L) Morale 7
A butterfly winged pixie, was caught by Dwyer a few days ago, and is beeing kept as a pet in his office. Saffron offers a Fae Boon if he is rescuted.
Approach
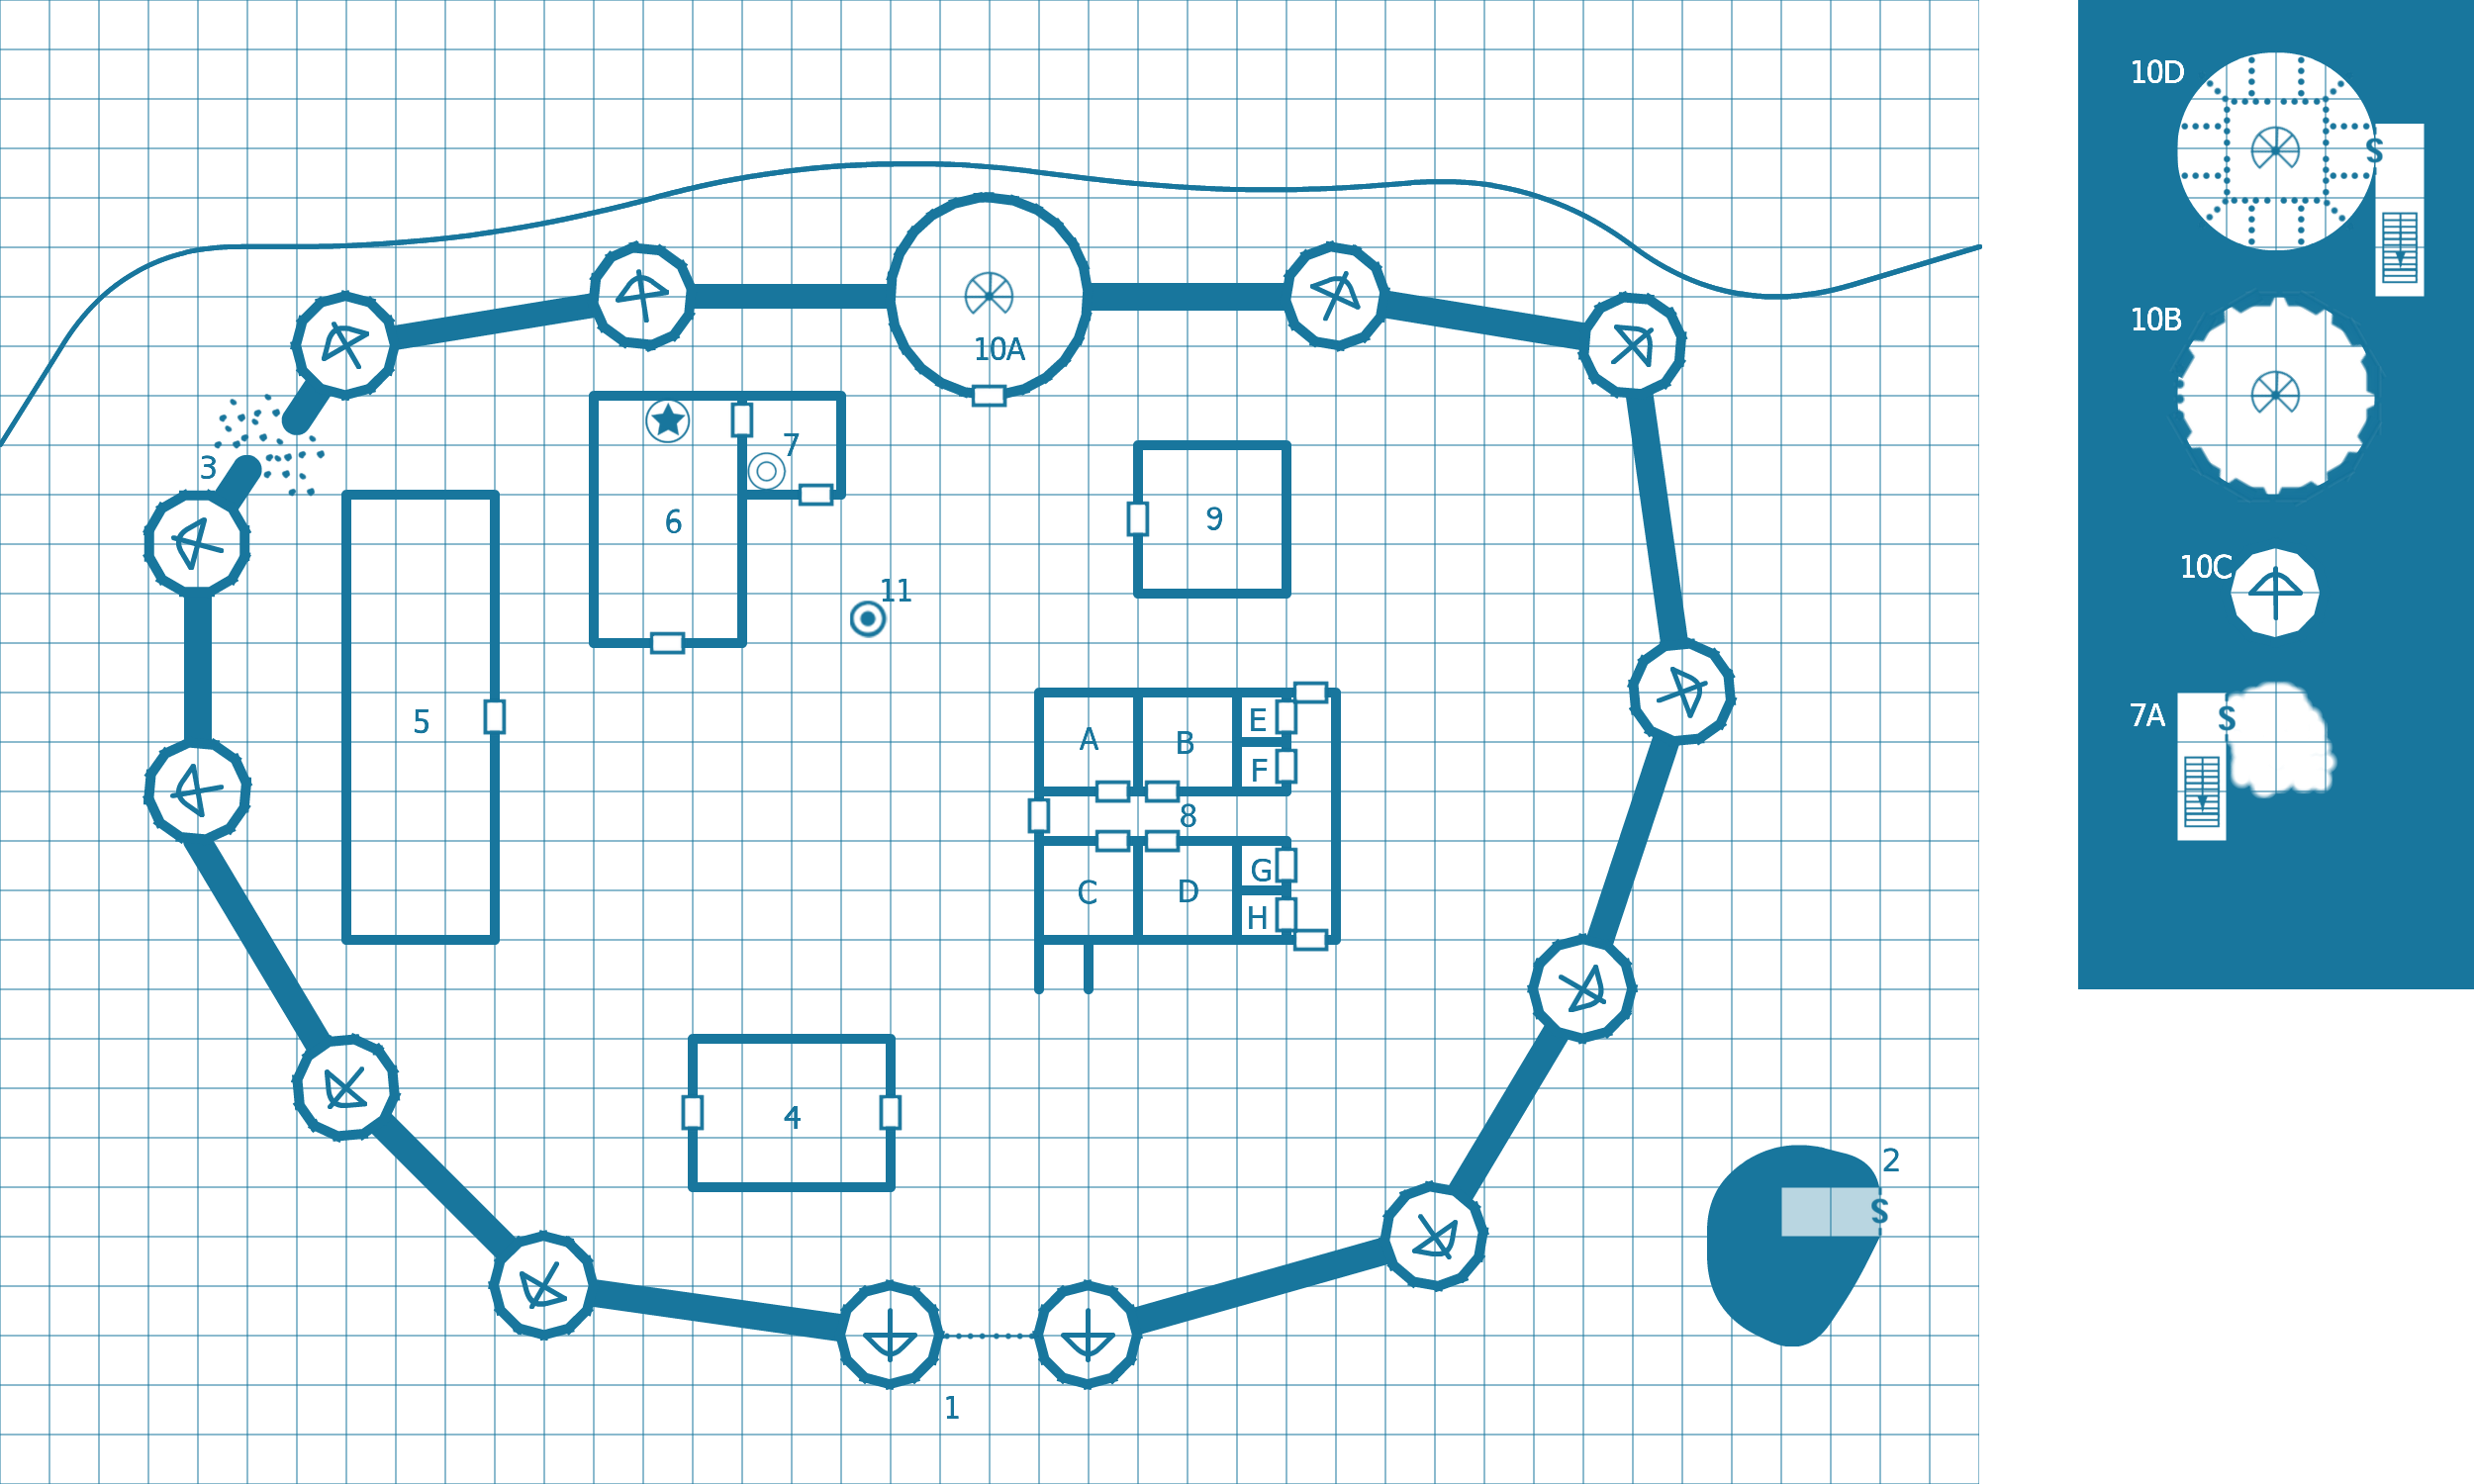
You find Riverwatch easily enough. You could see it from any vantage point in the area.
Built up on the rocky cliffs cut by the Great River, Riverwatch stands an imposing figure on the horizon. Rusted red balista bolts top the round stone turret of the wall. A similarly rusted iron portcullis stand between the centermost turrets. Standing above everything, a 3 story tower in the rear center of the fort is capped by a great iron brazier.
60 feet east of the fort, a great boulder juts out of the loamy soil, stretching 20 feet into the sky.
Throughout the fort, all buildings are cobblestone & mortar with flagstone floors.
1. Outside the Fort
The old iron portcullis is red with rust, and the chains that used to pull the gate up have broken and hang limply, rattling in the constant breeze of the river cliffs.
Iron Portcullis It takes 3 PCs to lift it up 2 feet. The rust and wear to the slides prevent it from going any higher without significant force.
-
Once forced beyond the blockage, the gate will sit open, but will fall 2d6 turns later.
-
The portcullis is climbable, but getting the entire party over will be loud and take 1 turn.
1A. Archery Range
Just inside the gate is the remains of a simple archery range. Long rotted dummies with soggy wooden shields sit at the end of a 50 foot range, indicated by a rectangle river rock, with thin grass now growing between the rocks. Against the nearby building, a small lean-to was built, containing a few barrels of arrows, and simple archery gear.
Dummies are mundane
Barrel of arrows Arrows are heavily damaged, and have a 50% chance of snapping on inpact, dealing no damage. All arrows from this barrel are unrecoverable.
Archery gear Consists of wrist guards and extra bowstrings, in good enough condition to use.
2. The Great Rock
The great bolder is even bigger that it appears, towering over you, and casting a heavy shadow. On the eastern side you find a faint engraving of a 7 pointed star. At each point of the star, a small rune is engraved.
7 pointed star The sigil of the Seven. This sigil is an indicator of a secret entrance to the temple under the fort.
-
To open the hidden door, one must place their hand on the star and request that they be let in, invoking their collective (Seven.) Upon doing so, the rock will shift inword and reveal a narrow staircase leading straight down through the rock, widening as soon as it is underground, and traveling down to the 3rd floor.
3. The Mound
Stacked against the side of the wall here are large stones, providing a simple enough climb to the top of the wall. These stones appear to have been torn or fallen from other parts of the wall, as small chunks of mortar cling to the rough hewn edges.
Large stones were placed here by the Kreck inside, so that they could cross over the wall with ease. Unfortunately, most adventurers are larger then the Kreck, and will likely cause the rocks to shift.
-
A character who investigates the pile for a turn finds a safe path up the rocks and can lead others without requiring a save.
-
Anyone who tries the climb without first assessing it must make a dexterity check or cause the rocks to shift (which is loud) dealing 1d8 damage to the one who failed the roll, as well as trapping their leg between the rocks. Anyone else on the pile at this time must make a dex check or take 1d4 damage from falling on the rough rock.
-
Extracting a stuck adventurer requires either a successful strength check or a turn of pulling aside rocks (which is loud).
-
Once the rocks have shifted once, they are now stable, and all can pass without a dex check.
4. The Office
Both doors are unlocked and open easily.
The old office building is exactly what you’d expect, a 40 by 30 foot room, with doors on the east and west walls. A few simple tables with wooden stools on each side fill the edges of the room. None of the furniture here is salvageable, as the glass in the windows broke long ago, and allowed the damp river water to rot them through. One large oak desk sits slumped to one side, it’s supports having broken under the weight of the wood in the corner. A matching wooden armchair once had a padded back and seat, but the fabric has been roughly cut away, and both it and the padding are missing.
Large oak desk contains a brass key (that opens the Armory) and a small pouch containing 4 silver and 6 copper.
Wooden armchair The fabric was ruddy brown. Otherwise unremarkable.
5. The Barracks
The single door is unlocked and opens easily.
A long squat building, 30 by 90 feet was once a barracks for the fort. Row after row of bunked beds and footlockers. Only about a third of the footlockers remain, the others prominently missing.
If the Jadebelt Children have not been found yet, they are in here arguing.
Locked footlocker In the north half of the room, contains 4 silver and 18 copper, and 3 torches.
6. The Common Hall
The southern door is blocked by a table that the Krecks move back and forth. The eastern door is a simple half door that leads into the kitchen.
This 30 by 50 room was once a shared space of many uses. A large symbol of the Family still hanging on the north wall implies that it was used for religious ceremonies, while the long benches and tables (now repurposed into small shelters) imply it was used as a mess hall. In the center of this room is a ring of rocks, creating a small firepit on the flagstone floor.
There are a total of 12 Krek in this tribe, 6 are combatants, 2 are adult non-combatants, 3 are children and the last is Ghita, who is an adolescent non-combatant.
If Ghita has met the players, and they were kind to her, she will be in here arguing with the chieftain (called Sir) about them. If she was treated poorly, the tribe will be hidden, and the 6 combatants will throw large rocks from cover until the party is disuaded. If the party kill 2 combatants, the noncombatants will attempt to escape and the remaining combatants will protect them with their lives.
The Kreck are trying to live peaceful lives, but are nervous about the cultists, who they refer to as "the crafters." Some of the combatants have seen the clockwork dolls and refer to them as the "ticking demons". Otherwise, they know that the cultists have a hidden lair somewhere, but not where it is.
Symbol of the Family is worth 20 silver to the Priest in Port Astoria. If the players are interested in it, the Kreck offer it as a reward to run off the crafters.
7. The Kitchen
The western half door leads into the Common Hall and the southern door is locked (Ghita keeps the key in her wheat bag)
This 30 by 30 room used to be the kitchen. As soon as you enter the room, you feel the temperature drop several degrees, as if you walked into a massive icebox. A large fireplace dominates the northeast corner, with a large cooking pot sitting on a stand over it, frost seems to be building up around the bottom edge of the pot. A long wooden preptable fills the center of the room, and large wooden shelves dominate the remaining space on the north and east walls. A trapdoor in southwest corner leads down into what you assume is a root cellar.
Cooking Pot Is cold to the touch. * There is brown mold growing in the bottom of the pot. Heating the pot causes the mold to expand out of the pot, dealing 3d6 damage to anyone near the pot.
North Shelf Empty, stains on the wood imply food was once stored upon them.
East Shelf Filled with cookware and dishware. Wooden plates, bowls and mugs, and a wicker basket containing iron cutlery.
Trapdoor No locking mechanism, opens easily
7A. The Root Cellar
The wooden ladder up to the kitchen is in acceptable condition.
The root cellar is a simple 20 by 20 room. Along the west wall are a stack of barrels laying on their sides, and the north wall is pockmarked with the telltale pattern of root vegetable growth.
If Ghita is still on the random encounter table, and hasn’t encountered the party, she’s here, secretly munching on her grain.
Barrels One of the bottom barrels has the 7 pointed star indicating it as an entrance to the hidden temple. Removing the lid reveals that the barrel is hollow and can be crawled through into the temple.
Vegetables Have not been harvested in some time, and sickly green leafs hang out of the wall. 50% chance of rot.
8. Officer’s Building
This wide, low building measures 60 by 50 and has a door in the center of the western face, as well as doors on the north and south faces at the eastern edge.
All doors are unlocked, but are stuck 50% of the time.
8A. Quartermaster’s Office
The door to the quartermaster’s office is swollen shut, and must be forced open.
This room is in surprisingly in good condition, a solid oak desk, surrounded by empty bookshelves. An inner set of shutters have protected this room from the elements, and dispite the accumulation of dust, the room is otherwise spotlessly clean.
8B. Martin’s Office
This room is destroyed. The simple wooden desk was caved in with some sort of blade and the bookshelves knocked over and lit ablaze. The walls and floor are caked with ash and soot. Surprisingly, the thatch roof above seems untouched.
The party will always encounter Martin in this room, who is a responsive ghost. He is unable to rest unless either:
-
His body in interred correctly
-
Dywer (the 2nd Officer, and Martin’s murderer) is killed
Martin was trapped in here and set ablaze after he found out about the temple below. Dywer used a clockwork device to prevent the whole building from burning, and fed rumors that Martin’s death was divine retribution, which lead to the forts abandonment within a year. If the party digs through the soot, they will find his corpse, but only his bones and sword remains, now blackened.
8C. Captain’s Office
This room was once quite stately, a pair of tattered banners fill the far corners of the room, and the oak desk, now clearly rotting sits clear in the middle of the room.
A single iron key hangs from a hook embedded at hand height in the wall.
A now faded map of the area is painted on the wall.
Iron key opens the tower.
Map is unreadable due to moisture damage, but designates about 6 miles of coastline, with Fort Riverwatch at it’s center.
8D. 2nd Officer’s Office
This simple office likely belonged to an underling. A desk, some chairs and a wooden shelf adorn the room. None of the furniture is inherently impressive, but it would have served it’s purpose.
8E-F. Officer Bunks
Each of these rooms consist of a simple bed, footlocker and a simple desk. The doors have locks but are only locked 25% of the time (no keys.)
The desks are clear, and the footlockers contain a random item off of the table.
| 1d8 | Contents |
|---|---|
1-4 |
Empty |
5 |
Paralysis Spider (1d6 turns) |
6-7 |
2d6 copper |
8 |
A personal nicknack |
8H. Quartermaster’s Bunk
The door is locked (no key.)
This 10x10 room contains a bed, a footlocker, a desk, and a chair.
The bed, it’s straw mattress damaged with age, is neat, and a simple wool is folded neatly in it’s center, a straw pillow placed next to it. The desk is clear of any furnishings, and the chair is neatly tucked under it. The footlocker is similarly neatly tucked under the bed.
Everything in this room is immaculately cleaned.
Footlocker Is empty
9. Armory
This stone building is windowless with reinforced iron door. Under the handle is a brass lock
Brass Lock is unlocked with the brass key in the office.
As you open the door, you know you’ve hit the jackpot. This room is the armory!
This 30 by 30 room is well organized, and well stocked. 6 sets of light armor sit on simple stands along the south wall, and the north wall has swords, shields, spears and bows. Directly across from the door is a long banner bearing the house crest of Astoria.
There are enough weapons to stock the party with weapons, but the limited armor remains. A barrel of quivers are also found in this room. The banner is in good shape, and Lord Daniel will pay 10 gold for it.
10. The Main Tower
By far the most imposing structure in Fort Riverwatch, the main tower has a 40 ft diameter and is twice the height of any other building. The entire second story is encircled by arrowslits, and atop the 3rd floor platform is a great ballista, similar to the ones on every other battlement. Above the ballista is a great brazier, likely to be used as a signal fire, as such a light could probably be seen from miles around.
The front door of the tower is reinforced and locked. Dwyer has one key, and the other is in the Captains Office.
10A. The Holding Room
A small wooden table near the door collapsed under it’s own weight, and a simple wooden stool lay kicked in a corner.
Along the western wall is a low stone bench with some 10 iron rings placed equidistant 3 feet above the bench. Matching rings sit embedded in the floor just in front of the bench. A ruddy stain starts on the bench under one of the rings, and continues forward, matching a second stain on the floor.
Now collapsed bookshelves lay face-down in the east half of the room.
In the north quarter of the room, a stately desk made of sturdy oak and a matching chair, which once had a cushioned seat and back, but the fabric was cut away long ago.
In the center of the room is a simple stone spiral staircase leading both up and down.
Collapsed Bookshelves Lifting them requires two people and reveal damaged and useless books.
Desk Contains the key to the cells downstairs, plus 36 copper and 2 silver.
10B. The Watch Platform
The staircase terminates at a landing, and an iron ladder leads to a hatch in the ceiling. Next to the ladder is a large barrel, containing 3 rusted iron ballista bolts.
The rest of the room consists of 12 arrowslits in every direction. Cutouts in the wall to the left and right of each slot could feasibly hold a dozen arrows each.
Hatch Now covered by rocks.
-
Forcing the hatch deals 1d4 damage (dex check for half damage)
Bolts can be used as Medium weapons
Arrowslits are mundane
cutouts Too long to easily see down with torchlight. A candle will shine to the bottom
-
The second one checked contains a pouch of 8 silver.
-
The fifth one checked contains a spider that bites any hand that reaches in. Con check or paralyzed for 1d6 turns.
10C. The Ballista
From the top of the tower you can see miles in every direction. The ballista is trained across the river, and a small spot of white against the grey of rocky beach far below, can be seen just west of the tower.
Ballista main rope is snapped with age, otherwise good condition.
Spot of White a pile of bones from bodies that fell victim to the trapped stairs. Only identifiable by spyglass, or a 2 hour detour (or the staircase to the riverbed inside the temple.)
10D. The Cells
The basement of the tower acted as holding cells for ner-do-wells. A dozen iron cells, the ends of which embedded in the floor, ceiling, and walls fill the outer edge of the room. The eastern cell is open, while all others are closed
Eastern cell contains a secret passage to the temple below.
-
To open the hidden door, one must place their hand on the star and request that they be let in, invoking their collective (Seven.) Upon doing so, the rock will shift inward and reveal a small landing before turning right and down.
11. The Well
There is a simple well here. Cobbled all the way down, the well seems to be in good condition, if uncovered.
The well is perfectly fine, and the water is clean.
12. Fear Powder Trap
The floor here has about two dozen 6 inch round metal plates strewn randomly across a 10 by 10 section.
Stepping on a plate causes it to puff fear powder into the air (wisdom or be overcome with fear for 2d6 turns, unable to continue forward or make positive actions)
13. Well Room
This room has a simple well in it. A winch system has been set up to lift a large basin up and down. The basin has a small spigot on the bottom to facilitate filling various containers.
This well is connected to the main well and is perfectly drinkable.
14. Trapped Stairs
The stairs leading down here are trapped. Upon reaching the halfway point, the center of the steps are false, stepping on them will cause them to give way, turning the remaining portion of the staircase into a slide, leading to a chute at the end of the stairs that dump unlucky victims 100 feet to the riverbed below, where they join the other skeletons.
The door at the bottom is false, and does not open.
15. False Reward
this is a 20 by 30 room. A large iron chest sits in the middle of the room, clearly bolted to the floor. A reinforced wooden door occupies the center of the east wall.
Iron Chest opens towards the reinforced door, and is trapped in 2 parts. The first trap is irritant powder (save or be blinded for 2d4 rounds) triggered when the chest is opened 10 degrees. The second trap is triggered if the lid is closed without being opened 45 degrees first. The platform outside the door to this room falls away, revealing a spiked pit 15 feet deep. A fall into these spikes deal 2d6 damage.
16. Dwyer’s Office
The main door is locked but not reinforced, and is engraved with an elaborate letter D.
This 30 foot square office is separated into two halves. The west half contains a desk and some bookshelves, the east half contains a full clockworkers workspace. Several small clockwork projects lay in disarray across the workbench. On the workbench, inside a large lantern, a 1 foot tall being with butterfly wings calls out to you for aid.
75% of the time, Dwyer is in his office, often going over plans for his secret project (the computing machine)
Bookshelves are mostly books about clockwork, notes on the same, or books about the seven. There are 3 books of note in the collection however:
-
A autobiographical memoir of the captain, clearly embellished, including a section about his "disastrous" love triangle with 2 women that resulted in them both leaving due to him being "too handsome for any one woman"
-
A copy of the "The Tales of Richard the Long (Vol 3.)". An impressively lewd romance novel depicting Richard on an ill defined mission that brings him into situations of varying undress and acts of romance with a variety of women.
-
A rambling tome written by Lord Laurel Astor, who claims to have been visited by a number of holy messengers, who aided her in becoming "wise beyond her age."
Someone with access to the library can spend 3 months researching to be able to understand the computing machine, and operate and extend it safely.
Workspace 50 silver worth of tools and materials.
Being A Pixie named Saffron, he was caught by Dwyer and kept as a pet. He resents Dywar and wants to be freed. If he is freed, he thanks the party by saying that the prayer room has some sort of secret exit.
16A. Ticking Shrine
The closet in Dwyer’s office appears to be a small shrine, but is a cover for a secret door that allows Dwyer to travel throughout the temple unimpeded
If approaching from the office
Behind the door is a small shrine. The wall has a finely carved engraving of a sigil imbedded with silver filigree. Placed on the shrine are dozens of little clockwork gizmos, and finely carved idols. Embedded at the foot of the shrine is a small brass clock with 1 hand, pointing straight up. A leather covered pad sits just in front of the clock, perfect for kneeling on.
If approaching from the Inner Sanctum
The door slides effortlessly into the wall, aided by unseen mechanisms, beyond it is a small dias covered in clockwork gizmos and finely carved idols. Embedded in the ground on the other side of the dias is a small brass clock with 1 hand, pointing straight up. A leather covered pad sits just beyond that, perfectly placed to kneel while interacting with the clock or the gizmos.
Sigil is of Aeto-Krah, and praying at this shrine will make contact with him.
Gizmos are simple clockwork devices, including a counterweight metronome, a lighter that uses hard alcohol as fluid, and a gyroscope. Each is worth 3d6x10 silver to a buyer interested in such things.
Idols There are 5 idols, and each could fetch 2d4 silver as works of art.
Brass clock is a countdown timer, upon wrapping all the way around (1 minute) will trigger a dusting of paralysis powder (con save or paralyzed for 3d4 turns.) The clock begins to tick when the pad is knelt upon, and stops if weight is released. The trap can be reset by pushing in the dial and twisting the hand. Pulling out the hand releases the secret door.
17. Mess And Kitchen
This room is divided into two sections. The primary space is a 40 by 30 room, dominated by 3 large tables with benches on either side. The secondary space appears to be a small kitchen, and the smell of stewing fish and vegetables dominates the room.
1d4+1 cultists (if possible) are here cooking. If not, they left food on the heat during their escape.
The soup is good, and can be used as Lunch if needed.
18. Cultist Dorm
The door here opens smoothly and quietly
This room is subdivided into 11 10-foot 3-sided rooms. Each contains a bunk bed, 2 simple desks and stools. Each room is concealed behind a canvas curtain
At any given time, a quarter of the living cultists are in here, reading, or sleeping, or studying.
19. Supply Closet
The door here is a barn-style and moves freely.
This 20 foot square room is a storeroom of sorts.
Various crates and barrels dominate the northwest corner of the room. The southwest corner has a large spoked wheel in the middle of it. The southeast corner is empty, save for four ropes that are affixed to the iron plate on the floor. The middle of the plate is grated to see below it.
Crates and Barrels contain various supplies, including parchment, ink, small chemical vials, weights, ect.
Spoked Wheel Takes 4 characters to turn and lifts the compartment in the southeast corner.
Ropes are well affixed to the plate, which is actually a 5 sided cube (the 6th faces north and is open)
Grate Looking through the grate shows that the plate is in fact a box of sorts. If the Gelatinous Cube has not been removed from the wandering encounter table, it is inside the box, filling it, and giving the impression that the iron plate is covering some sort of water source.
-
Referee Note: The cult uses the cube as a hall-cleaning tool. When not in use, it’s kept here.
20. Entrance to the Deep Expanse
The room hidden here contains only a great iron disk on the floor, upon it is inscribed "Woe be Ye, who explores the Deep Expanse"
The iron disk can be lifted by 4 PCs and reveals a staircase leading into the Deep Expanse. If you do not intend to include the Deep Expanse, it can lead to the underdark, or possibly require unavailable magic to trigger it’s opening.
21. Prayer Room
The prayer room is shielded by a simple canvas sheet.
In this room there is a simple shrine, upon it, a stub of wax remains. The shrine depicts a 7 pointed star made of iron, with a different sigil at each point. Etched under the star is the phrase "Darkness lights my way"
A ritual dagger set atop a small copper offering bowl sit at the foot of the shrine.
Ritual Dagger Light weapon, worth 10 silver
Offering Bowl Worth 5cp, if a blood sacrifice is made into the bowl, the character donating the blood receives a psychic message from the Seven associated with their highest attribute, offering them power in exchange for fealty If the character is already a cultist, instead they gain a boon from their god.
-
If the character accepts the offer, they are instructed on how to use the summoning circle in the Chamber of the Seven
-
Rejecting the offer angers the god, requiring a save or take 2d4 psychic damage. Any lethal damage dealt by this attack causes the character to enter a coma for 2d6 weeks. Upon waking, they are overcome with an irresistible urge to test and better the attribute associated with the god they spurned.
If all other light sources are extinguished save for the wax nub, the light reflects off of the star and indicates the same symbol on the wall across the way, signifying the access point of of the secret door hidden there.
22. Walk of Faith
A narrow stone bridge leads across an expanse of water below, above you can see a dark hole in the ceiling, leading down into the water below.
The water is quite still, and smells faintly of mint.
Bridge stable enough for 1 to cross at a time, but more will cause it to collapse, dumping in the 2nd rank, and requiring a dex check for the 1st and 3rd rank to escape to their side.
Water Is actually a strong acid, dealing 4d8 damage if one falls in.
23. Chamber of the Seven
The ground continues out into the center of a great pool of water, 50 feet in diameter.
Along the walls, you can see 7 alcoves, each with a stone tablet displaying a different sigil.
At the end of the path, there is an iron ring, inscribed within is a 7 pointed star. Each point has the same sigil as the tablet it points to.
Below, the water glows faintly blue.
7 pointed star Summoning circle. Entering it and envoking the name of one of the seven triggers an automatic awakening, but the character must succeed on a Save or must become a cultist at their next level up.
Water The water is holy water for the 7, and glows blue due to harmless phosphorescent algae.
24. Waiting Room
The door here opens easily, on it is written "waiting room"
This 10 by 20 room contains two long benches on either side, and a small pull rope near the door.
Pulling the rope rings a bell in Dywer’s office. He will come investigating 2d6 rounds later, ensuring the trap at 16 is locked, unless he sees the party in the hall. Then he will stop at the cupboard and unlock the trap before announcing his presence, and offering parley.
24A. Investigator’s Trap
On the eastern wall here, a wooden wardrobe is mounted on the wall.
10 feet south of the cupboard is a small drain in the floor.
The wardrobe is part of a trap. 10 feet to the south (around the drain) is an elevator shaft taking up the full width of the hall. When the trap is engaged, putting weight on that part of the floor causes that section of hallway to suddenly drop 20 feet.
The first rank will be trapped, and the second rank must make dex checks or be trapped as well. The rest of the party has an uncovered 10 ft pit to deal with. The ropes of the mechanism are shrouded in the wall, so they are not useful for crossing the pit.
No longer impeded by the edges of the elevator room, water begins to pour in. Over the next 20 rounds the chamber begins to fill with water, 6 inches each round.
Inside the wardrobe is a swing-out crank that can be used to lift the elevator back up the shaft. 2 characters cranking the shaft will lift it 1 foot each round, but as the shaft fills, stronger and stronger characters are needed to lift the elevator, the contents, and the water. Each round requires a combined [15 + 2 * feet of water] strength to lift.
The ground here is imperceptibly sloped, so any excess water drains down and away at 1 gallon per minute.
The crank’s handle is also the locking mechanism for the trap. When fully wound, the handle can be pressed through into the stone, preventing the elevator from moving.
On the inside of the cupboard are 23 small wooden toggles either filed under "in" or "out". Each toggle represents a member of the cult, and so long as at least 1 toggle is out, the trap is locked.
If the party has encountered the cultists on the surface, and any were able to escape, they’ve unlocked the trap, even if others are still outside.
25. Inner Sanctum
The door to this room is unlocked.
This 30 foot square room is dominated by a massive clockwork device. It stands taller than a man, and is made up of thousands of tiny cogs, wheels and springs. Every available piece of wallspace in this room is filled with workbenches or shelves, containing tools and various clockwork pieces. A small forge takes up a corner of the room, currently cold. A wooden crate at the foot of the device is filled with thin iron sheets.
Above the workbench is a small iron cone sticking out of the ceiling*
There is a 25% chance of Dywer being in here each time the party enters.
Device Is a general purpose computing machine. Uses tin punchcard sheets, is 10 bit, has 8 operations (AND OR NOT ADD SAVE LOAD JEZ JNE) and 8 memory locations, plus working memory. Each memory location is represented visually by a 3 handed dial representing a number from 0-999. The memory locations can be manipulated by turning a small knob on the edge of the dial. The working memory dial is twice the size of the other 8.
-
Reverse engineering the device would take 3 months, and has a 1% cumulative chance each day to accidentally break, unless divinely inspired.
-
The devices operation process can be discerned by spending 1 hour investigating the device, but has a 1 in 10 chance of breaking the fragile device
Tools There are all the tools that make sense for a clocksmith, as well as a hole punching device used to write programs for the device. A set of precision tools can be assembled from stolen pieces, or the set together is work 10 gp to a clocksmith, provided one is available and can afford a second set.
Pieces The clockwork pieces are bits of the machine under construction or discarded. Without context, they are only worth the metal they’re made of.
Iron Sheet The programming punchcards of the machine. Each line has a 3 bit opcode and 10 bit dataspace. Keystones along the edge allow the card to be moved up and down Each sheet is engraved with a name, including "Combiner", "Indivisables", "Thief", "Squares", and "Secrets"
-
Combiner adds the sum of all 8 values into the working value
-
Indivisables increments working memory until the value is prime
-
Thief subtracts the first memory location from the second and stores it in working memory.
-
Squares squares the number in the first memory location
-
Secrets generates a psudorandom number using the first two memory locations as a seed.
Cone transfers sound from Dewer’s office to his sanctum.
Magic Items
Amulet of the Seven
The amulet is made of simple wrapped wire on a leather cord. wearing the amulet grants the player a throughline to the member of the 7 depicted, or in the case of the star, whichever matches their greatest Primary Attribute.
With this connection, the character can take levels as the cultist, and can ask [1 + cultist templates] trivial (to a deity) questions per day.
Once a character has made connection with one of the seven, they may not make connections with other members.
+1 Sword of Reassembling
This longsword appears to be made up of various bits of loaned metal, including brass, iron, lead and possibly even silver. On a critical hit, the weapon explodes, dealing an extra 1d6 damage to it’s target and any foes nearby. Once destroyed this way, the sword can be rebuilt by being left in a pile of metal scrap overnight. The scrap will be consumed into the blade and the blade will be reforged. The party can recover bits of the sword after combat (similar to arrows) and recover half the necessary materials. In the worst case, 50 copper coin can be used as the material needed to reconstruct the weapon.
Talisman of Passage
This talisman has the crest of House Astor on it, and will allow passage through the gates of the Astorian Keep.